The Notes page or tab can be customized to your purposes by adding new
fields to it and creating a page layout, just like a custom object. You
can then use it to keep specific related information for your other objects
and records.
You can add fields to the Notes page to add to the information that
can be available on the Notes page or tab. This can include Attachment
fields that allow you to attache files to the notes. The attached
files can be of any type, up to 10 MB in size. For more details
on working with custom fields, see: Custom
Fields and Formulas Overview
Select
the Note object from the list
and click on it.
On
the Fields and Relationships tab,
click the New button.
Choose
the field type. This can be determined by what information is to
go into the field. See Custom
Fields for more information about the field types and how to set them
up.
Click
the Next tab.
Enter
the properties for your field. Properties include things like what
the field is to be called, e.g. First Name, is it required or optional,
etc. See Custom
Field Properties for more information.
Click
the Next tab.
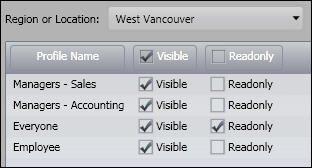
Set
the profile permissions on the field. These are Visible and Read
Only. This sets which users (by their profile) will be able to see
and / or change the information. For example, employees may not
be able to see the home phone number of other employees (Visible is not
checked), department managers can see it but can't change it (Read Only
checked), and only the HR Manager profile can change it. If there
is more than one region or location, make sure that users in those regions
and locations have any necessary permissions set as well.
Click
the Next tab.
If
you have created different page layouts for the object, you can choose
which layout that the Notes tab will appear on by clicking the Add
checkbox.. For example, for a Customer object, you may have two
layouts showing different fields (information), one for sales people,
and one for accounting. You can choose to have the notes up on only
one or both of the different layouts. This way you can keep information
specific to those who need to see it. See Page
Layout for details.
Click
Save.
Notes can only have one page layout.
Select
the Note object from the list
and click on it.
Select
the Page Layout tab.
Give
the layout a descriptive name.
In
the Section Properties, give the first section a Name, and select the
number of columns and rows.
If
you want the section to be open and displayed when the user sees the page,
check the Selection Expanded box.
Otherwise the user will see the section on the page and be able
to expand it themselves.
Click
on a field from the list and drag it and drop it into the place where
you want it to appear. You can clear a field by reversing this,
just click on the field in the section then drag it over to the list.
If
you want to add a new section click on the New
Section button.
When
a field has been added to a section, click on the field icon to set it's
properties. These appear at the top right. You can make a
field Required (must be filled in when creating a new entry), Read Only
(can not be changed), and Show in Summary (see it in the summary view).
You
can click on Add Related Tab to add a Notes and/or user Audit tab to the
layout. Notes allows the user to enter information into a text field,
while Audit allows you to see a record of who had been working with the
record.
Click
Add Button if you want to select
buttons to the layout. See Custom
Buttons about creating buttons and what functions they can do.
If
you want to add fields from a related object, select the object from the
drop down list above the Available Fields, and you can select, drag, and
drop fields from the related object into the layout.
If
you want to add Reports or Dashboards to the layout, select Report Charts
from the drop down list above the Available Fields, and you can select,
drag, and drop those onto your layout. See Reports
or Dashboards for details.
Click
Preview to see the basic layout
displayed.
Click
Preview Summary to see the Summary
view. You must have at least one field with it's Show in Summary
property checked to have a Summary view.
Click
Save to finish.
You can change and update views that you have already created and saved.