When the PerfectScan application in installed in PerfectMind it has to be set up to scan objects and respond to scanning input from the object records.
Permissions are required to work in the Setup
PerfectScan is configured from Setup > Company Setup > Applications > PerfectScan. From here you can do two things. The first is to set and create messages that will be presented when objects are scanned, and the second is to add objects to PerfectScan so that it can scan them. This is to set up the objects that can be scanned.
For each object that you want to make scannable, the object will need to have a custom field that acts as the scan Id for the records in the object. The scan Id must be unique for every record so that PerfectScan can determine exactly what record, that is, exactly which contact, inventory item, etc., is being scanned in.
Using the scan Id, you can customize the behaviour of PerfectScan. Every scan Id needs a Prefix, which is some identifying combination of letters and / or numbers for that objects records. For example, the scan Id's of all Contact records might begin with "CON", such as CON123, CON34, CON2345, etc.. Within those contact records, you may have Members and Employees. You could then use a Suffix to sort the members from employees, such as "MEM" and "EMP", e.g. CON123MEM, CON432EMP. You could also use the length of the scan Id to separate different records; perhaps member Id's are 12 digits long, but employee Id's are only 5 digits long. You can then assign different messages and Workflows based on what kind of contact was scanned.
Note: If you use just a prefix, e.g. "CON", with no suffix and / or length, PerfectScan assumes that it refers to all Contacts, and you won't be able to add any more scanning rules.
For each object that you want to scan, it needs to be added to PerfectScan so that PerfectScan recognizes it.
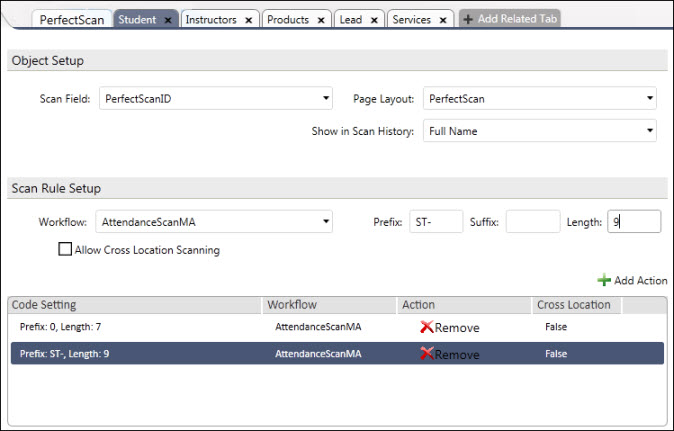
Click the Add Related Tab. This will bring up a list of available objects.
Select the object that you want to make scannable and add to PerfectScan.
Select the Scan Field. That is the field on the object that provides the unique identifier for each record for each object. The "ID Type" field from a custom object can be a good choice here, particularly if you used the Auto Number selection, and set up the display format to use letters like "CON" for contacts, "I" for inventory, etc. If you need to add a scan Id field to the object see Custom Fields and Formulas Overview and Fields and Relationships for details.
Select a Page Layout for the PerfectScan desktop application. The PerfectScan desktop application can display the information from this page layout when a record has been scanned. For example, it could show a contacts name and picture when the contact scans in, or the price and inventory status of an item. For more information on creating a page layout see Create a Page Layout.
Show in Scan History lets you select a field that will be displayed in the Scan History window that opens from the left side of PerfectScan.
If you want PerfectScan to run a Workflow operation when a record is scanned in, select a Workflow from the list. For example, when a contact scans in it could trigger a Workflow to create an entry in an attendance log. See Workflow Overview for details on Workflows.
Enter the Prefix for the scan Id. The Prefix is required. The Prefix is the first character or characters of the unique scan Id for a record. PerfectScan uses this to distinguish the different records for different objects from each other. For example, all contacts might have a scan Id that begins with "CON", inventory items with "I", etc.
If, for the same object, you want to have different messages and Workflows for different records, you can use the Suffix of the scan Id and / or the Length of the scan Id as a way that PerfectScan can recognize different records.
Click the Add Action button to add this scan action to the list.
Add other scan actions for the object as you need.
Configure PerfectScan Messages