The PerfectScan desktop application has several configuration options, including the ability to use more than one scanning device, display options, device configuration, and automatic run options.
Administrator access or profile permissions are required for setup.
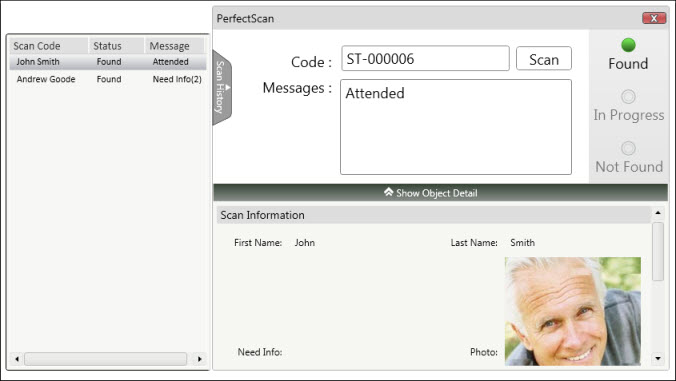
The PerfectScan desktop application, when fully expanded, shows several things. The main window in the middle shows the scan Id code, whether the scan was successful, and any messages that are appropriate to the scanned object. For manual entry the user types the scan Id into the text area and clicks the Scan button. The sidebar on the left shows the history of previous scans, what was scanned and whether the scan was successful. The sidebar can be shown or hidden by clicking the "Scan History" button on the left side. The bottom section shows the details for the current scan. The details are based on the page layout that is selected for the particular object being scanned. This can be shown or hidden by clicking the "Show / Hide History" button at the bottom. The page layout is created in the object to be scanned, and selected from Setup > Company Setup > Applications > Perfect Scan and the Add Related Tab if adding a new scannable object or from the tab with the object's name.
You can enter and change certain options for the PerfectScan desktop application from the application itself. The application must be running to do this. Double click on the PerfectScan shortcut or go to Start > All Programs > PerfectMind > PerfectScan to run it, if necessary.
When PerfectScan runs, it will appear as an icon in the system tray at the bottom right corner of your screen.
Right click on the icon to see the setup options.
Open: Shows the full application on your screen. Clicking the [X] in the top right corner will only minimize the application, it will not stop it from running. Scanning will still be logged.
Options: Shows the various configuration options for PerfectScan. See Options below for details.
Exit: Stops the PerfectScan application and closes it. Information from scanning will not be logged.
Options
Check for Updates: You can manually see if there are any updates available for PerfectScan. You will also receive update notification through PerfectMind as well.
Log Out: Logs PerfectScan out from the application. You can log in again, or shut it down by clicking Cancel.
Run at Startup: If this is checked, PerfectScan will automatically run when you start (or re-start) your computer. If a computer is going to be used for regular scanning (e.g. customer attendance, sales, etc.) this option should be selected so that PerfectScan is always running and logging scan information.
Devices: Add and configure different scanning input devices. Currently only serial bar code scanners are supported.
Add Device: Add a new scanning device to PerfectScan, e.g. adding a second scanner.
Device X: Configuration information for the scanning device. Currently this is only for serial scanners. See below for serial scanner information.
Serial Scanner Device Information
COM Port: Where the computer looks for the information from the scanner. Depending on the computer, hardware devices, software, etc. you may have to try selecting different COM Ports until the computer no longer gives you a busy or can not connect message.
Baud Rate: Speed of data transmission. This is build into the device. Changing the speed will not transfer the information any faster or slower, but may result in the computer not being able to read the data. Default for serial scanners is usually 9600.
Data Bits: Communication protocol. Determines much of the data is actual information and how much is information for the system about how the data is being communicated. Default is usually 7 (bits), but it can be 8.
Stop Bits: Communication protocol. Default is usually 2, but it can be 1.
Parity: Communications protocol. Default is usually None.
Handshaking: Communications protocol. Default is usually None.
Delete: Remove the device from PerfectScan.
Scanning Tips
If there is no input into PerfectScan when a scanner is used to scan something, try changing the COM Port settings until data shows up.
If the input does not match what is scanned, e.g. for 12345 you see 23FS# or similar garbled output, try changing the Parity setting then scan again (repeat for all Parity settings until output is correct then stop). If that does not work, try changing the Data Bits and scan again (repeat for all settings until output is correct then stop).
Configure PerfectScan Messages
Configure Perfect Scan Objects