Automating emails will save your business time and money as you will no longer need to spend as much time sending out emails and chasing contacts for various reasons, such as delinquency. Your PerfectMIND database will come with several types of automation criteria you can use to create automated emails; however, you can modify and create your own criteria lists at anytime.
Email automation can be set in three ways; Send On, When Criteria Met, or on a Sending Pattern.
Note: To learn more about basic email features,
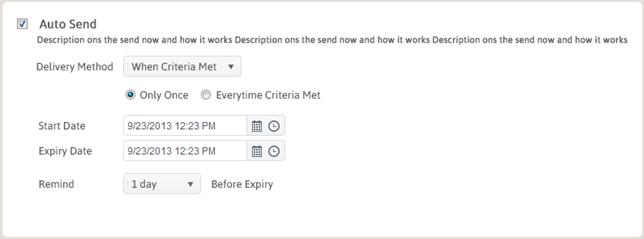
At the bottom of the email body, check Auto Send.
Send On
Select this option to send your email on a specific date; for example, a holiday.
Sending Pattern
Select this option to send your email on a pattern; for example, monthly.
When Criteria Met
This method allows you to have an email send automatically when a certain set of criteria is met; for example, when a lead is 7 days old.
To set automation, you must first create or select a list with the criteria you would like to use to filter. Once you have selected that list, it is displayed under the To field.
The following criteria options are available:
- One Time: Use this option for most emails. One time means the email send one time which is the specific time the criteria is met.
- Every Time Criteria is Met: This means that the email will be sent every time the criteria are met, which occasionally could mean that the contact will receive multiple emails. This option is best utilized for birthday email set up.
- Start Date: The start date will always default to the day you make the automation at 12 AM. To fix this, bump the email up a couple hours, for example, 10 PM. If you do not bump the time ahead, you will get an error message, because you cannot send email into the past!
- Expire Date: I usually recommend bumping this about 10 years into the future, that way you don’t need to worry about when it will stop sending. You must set it in this order: Click on the mini calendar, select the year, and then you MUST select the day.
- Reminder: This is just a setting that will remind you the day before your email will expire, which is 10 years down the road anyway, (do not set the expiry past 2030).
Once you are done click Send at the top of the page.
Your automated email will now be saved in the scheduled folder on the left hand side. If you need to edit your email, click on the scheduled folder, click on your email, change it, and then click send again to save your changes.
Note: To remove an automated email, go to the scheduled folder on the left, and check the box next to the email you want to end. Click Delete at the top of the page.
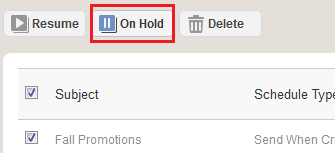
Scheduled emails can be placed on Hold if they are not currently in use, but may be used later; for example, a seasonal promotion.
To place a scheduled email on Hold:
- From the Email page, click Scheduled on the left to access your scheduled emails.
- Check the box to the left of the email(s) you would like to place on Hold.
- Click On Hold at the of the page.
A pop-up appears.- Click Yes to place the email on Hold.
Note: Emails which are on Hold have the Status: On Hold displayed at the far right.

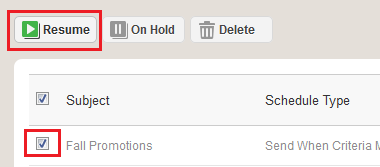
To Resume the email:
- From the Email page, click Scheduled on the left to access your scheduled emails.
- Check the box to the left of the email(s) you would like to Resume.
- Click Resume at the of the page.
A pop-up appears.- Click Yes to have the email Resume.